![]()
Getting Started with Object Detection using IceVision
Introduction
IceVision is a Framework for object detection and deep learning that makes it easier to prepare data, train an object detection model, and use that model for inference.
The IceVision Framework provides a layer across multiple deep learning engines, libraries, models, and data sets.
It enables you to work with multiple training engines, including fastai, and pytorch-lightning.
It enables you to work with some of the best deep learning libraries including mmdetection, Ross Wightman's efficientdet implementation and model library, torchvision, and ultralytics Yolo.
It enables you to select from many possible models and backbones from these libraries.
IceVision lets you switch between them with ease. This means that you can pick the engine, library, model, and data format that work for you now and easily change them in the future. You can experiment with with them to see which ones meet your requirements.
In this tutorial, you will learn how to
1. Install IceVision. This will include the IceData package that provides easy access to several sample datasets, as well as the engines and libraries that IceVision works with.
2. Download and prepare a dataset to work with.
3. Select an object detection library, model, and backbone.
4. Instantiate the model, and then train it with both the fastai and pytorch lightning engines.
5. And finally, use the model to identify objects in images.
The notebook is set up so that you can easily select different libraries, models, and backbones to try.
Install IceVision and IceData
The following downloads and runs a short shell script. The script installs IceVision, IceData, the MMDetection library, and Yolo v5 as well as the fastai and pytorch lightning engines.
Install from pypi...
# Torch - Torchvision - IceVision - IceData - MMDetection - YOLOv5 - EfficientDet Installation
!wget https://raw.githubusercontent.com/airctic/icevision/master/icevision_install.sh

# Choose your installation target: cuda11 or cuda10 or cpu
!bash icevision_install.sh cuda11
... or from icevision master
# # Torch - Torchvision - IceVision - IceData - MMDetection - YOLOv5 - EfficientDet Installation
# !wget https://raw.githubusercontent.com/airctic/icevision/master/icevision_install.sh

# # Choose your installation target: cuda11 or cuda10 or cpu
# !bash icevision_install.sh cuda11 master
# Restart kernel after installation
import IPython
IPython.Application.instance().kernel.do_shutdown(True)
Imports
All of the IceVision components can be easily imported with a single line.
from icevision.all import *
[1m[1mINFO [0m[1m[0m - [1mThe mmdet config folder already exists. No need to downloaded it. Path : /home/dnth/.icevision/mmdetection_configs/mmdetection_configs-2.16.0/configs[0m | [36micevision.models.mmdet.download_configs[0m:[36mdownload_mmdet_configs[0m:[36m17[0m
Download and prepare a dataset
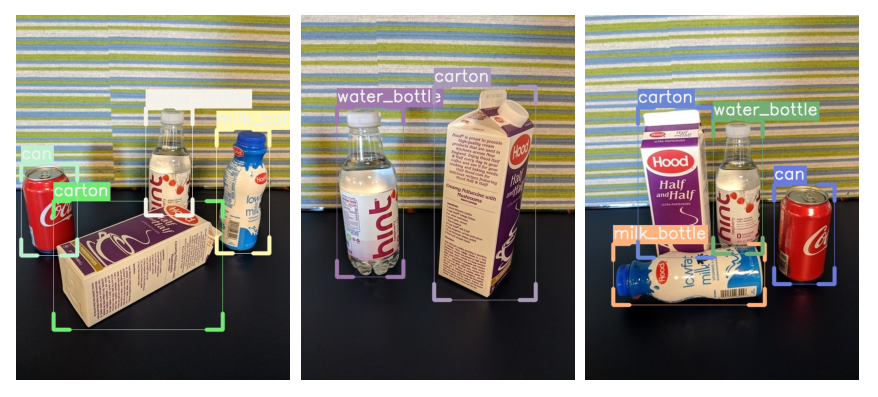
Now we can start by downloading the Fridge Objects dataset. This tiny dataset contains 134 images of 4 classes: - can, - carton, - milk bottle, - water bottle.
IceVision provides methods to load a dataset, parse annotation files, and more.
For more information about how the fridge dataset as well as its corresponding parser, check out the fridge folder in icedata.
# Download the dataset
url = "https://cvbp-secondary.z19.web.core.windows.net/datasets/object_detection/odFridgeObjects.zip"
dest_dir = "fridge"
data_dir = icedata.load_data(url, dest_dir)
Parse the dataset
The parser loads the annotation file and parses them returning a list of training and validation records. The parser has an extensible autofix capability that identifies common errors in annotation files, reports, and often corrects them automatically.
The parsers support multiple formats (including VOC and COCO). You can also extend the parser for additional formats if needed.
The record is a key concept in IceVision, it holds the information about an image and its annotations. It is extensible and can support other object formats and types of annotations.
# Create the parser
parser = parsers.VOCBBoxParser(annotations_dir=data_dir / "odFridgeObjects/annotations", images_dir=data_dir / "odFridgeObjects/images")
# Parse annotations to create records
train_records, valid_records = parser.parse()
parser.class_map
Creating datasets with agumentations and transforms
Data augmentations are essential for robust training and results on many datasets and deep learning tasks. IceVision ships with the Albumentations library for defining and executing transformations, but can be extended to use others.
For this tutorial, we apply the Albumentation's default aug_tfms to the training set. aug_tfms randomly applies broadly useful transformations including rotation, cropping, horizintal flips, and more. See the Albumentations documentation to learn how to customize each transformation more fully.
The validation set is only resized (with padding).
We then create Datasets for both. The dataset applies the transforms to the annotations (such as bounding boxes) and images in the data records.
# Transforms
# size is set to 384 because EfficientDet requires its inputs to be divisible by 128
image_size = 384
train_tfms = tfms.A.Adapter([*tfms.A.aug_tfms(size=image_size, presize=512), tfms.A.Normalize()])
valid_tfms = tfms.A.Adapter([*tfms.A.resize_and_pad(image_size), tfms.A.Normalize()])
# Datasets
train_ds = Dataset(train_records, train_tfms)
valid_ds = Dataset(valid_records, valid_tfms)
Understanding the transforms
The Dataset transforms are only applied when we grab (get) an item. Several of the default aug_tfms have a random element to them. For example, one might perform a rotation with probability 0.5 where the angle of rotation is randomly selected between +45 and -45 degrees.
This means that the learner sees a slightly different version of an image each time it is accessed. This effectively increases the size of the dataset and improves learning.
We can look at result of getting the 0th image from the dataset a few times and see the differences. Each time you run the next cell, you will see different results due to the random element in applying transformations.
# Show an element of the train_ds with augmentation transformations applied
samples = [train_ds[0] for _ in range(3)]
show_samples(samples, ncols=3)

Select a library, model, and backbone
In order to create a model, we need to: * Choose one of the libraries supported by IceVision * Choose one of the models supported by the library * Choose one of the backbones corresponding to a chosen model
You can access any supported models by following the IceVision unified API, use code completion to explore the available models for each library.
Creating a model
Selections only take two simple lines of code. For example, to try the mmdet library using the retinanet model and the resnet50_fpn_1x backbone could be specified by:
model_type = models.mmdet.retinanet
backbone = model_type.backbones.resnet50_fpn_1x(pretrained=True)
We've selected a few of the many options below. You can easily pick which option you want to try by setting the value of selection. This shows you how easy it is to try new libraries, models, and backbones.
# Just change the value of selection to try another model

selection = 0

extra_args = {}

if selection == 0:
  model_type = models.mmdet.vfnet
  backbone = model_type.backbones.resnet50_fpn_mstrain_2x

if selection == 1:
  model_type = models.mmdet.retinanet
  backbone = model_type.backbones.resnet50_fpn_1x
  # extra_args['cfg_options'] = {
  #   'model.bbox_head.loss_bbox.loss_weight': 2,
  #   'model.bbox_head.loss_cls.loss_weight': 0.8,
  #    }

if selection == 2:
  model_type = models.mmdet.faster_rcnn
  backbone = model_type.backbones.resnet101_fpn_2x
  # extra_args['cfg_options'] = {
  #   'model.roi_head.bbox_head.loss_bbox.loss_weight': 2,
  #   'model.roi_head.bbox_head.loss_cls.loss_weight': 0.8,
  #    }

if selection == 3:
  model_type = models.mmdet.ssd
  backbone = model_type.backbones.ssd300

if selection == 4:
  model_type = models.mmdet.yolox
  backbone = model_type.backbones.yolox_s_8x8

if selection == 5:
  model_type = models.mmdet.yolof
  backbone = model_type.backbones.yolof_r50_c5_8x8_1x_coco

if selection == 6:
  model_type = models.mmdet.detr
  backbone = model_type.backbones.r50_8x2_150e_coco

if selection == 7:
  model_type = models.mmdet.deformable_detr
  backbone = model_type.backbones.twostage_refine_r50_16x2_50e_coco

if selection == 8:
  model_type = models.mmdet.fsaf
  backbone = model_type.backbones.x101_64x4d_fpn_1x_coco

if selection == 9:
  model_type = models.mmdet.sabl
  backbone = model_type.backbones.r101_fpn_gn_2x_ms_640_800_coco

if selection == 10:
  model_type = models.mmdet.centripetalnet
  backbone = model_type.backbones.hourglass104_mstest_16x6_210e_coco

elif selection == 11:
  # The Retinanet model is also implemented in the torchvision library
  model_type = models.torchvision.retinanet
  backbone = model_type.backbones.resnet50_fpn

elif selection == 12:
  model_type = models.ross.efficientdet
  backbone = model_type.backbones.tf_lite0
  # The efficientdet model requires an img_size parameter
  extra_args['img_size'] = image_size

elif selection == 13:
  model_type = models.ultralytics.yolov5
  backbone = model_type.backbones.small
  # The yolov5 model requires an img_size parameter
  extra_args['img_size'] = image_size

model_type, backbone, extra_args
backbone.__dict__
Now it is just a one-liner to instantiate the model. If you want to try another option, just edit the line at the top of the previous cell.
# Instantiate the model
model = model_type.model(backbone=backbone(pretrained=True), num_classes=len(parser.class_map), **extra_args)
Data Loader
The Data Loader is specific to a model_type. The job of the data loader is to get items from a dataset and batch them up in the specific format required by each model. This is why creating the data loaders is separated from creating the datasets.
We can take a look at the first batch of items from the valid_dl. Remember that the valid_tfms only resized (with padding) and normalized records, so different images, for example, are not returned each time. This is important to provide consistent validation during training.
# Data Loaders
train_dl = model_type.train_dl(train_ds, batch_size=8, num_workers=4, shuffle=True)
valid_dl = model_type.valid_dl(valid_ds, batch_size=8, num_workers=4, shuffle=False)
# show batch
model_type.show_batch(first(valid_dl), ncols=4)
Metrics
The fastai and pytorch lightning engines collect metrics to track progress during training. IceVision provides metric classes that work across the engines and libraries.
The same metrics can be used for both fastai and pytorch lightning.
metrics = [COCOMetric(metric_type=COCOMetricType.bbox)]
Training
IceVision is an agnostic framework meaning it can be plugged into other DL learning engines such as fastai2, and pytorch-lightning.
Training using fastai
learn = model_type.fastai.learner(dls=[train_dl, valid_dl], model=model, metrics=metrics)
learn.lr_find()

# For Sparse-RCNN, use lower `end_lr`
# learn.lr_find(end_lr=0.005)
learn.fine_tune(20, 0.00158, freeze_epochs=1)
| epoch | train_loss | valid_loss | COCOMetric | time |
|---|---|---|---|---|
| 0 | 4.282796 | 3.556162 | 0.000000 | 00:03 |
| epoch | train_loss | valid_loss | COCOMetric | time |
|---|---|---|---|---|
| 0 | 2.906284 | 1.651251 | 0.514744 | 00:03 |
| 1 | 2.120166 | 1.340260 | 0.636351 | 00:03 |
| 2 | 1.760227 | 1.048941 | 0.744560 | 00:03 |
| 3 | 1.543842 | 1.071704 | 0.850686 | 00:03 |
| 4 | 1.387548 | 0.964828 | 0.843832 | 00:03 |
| 5 | 1.284623 | 0.858511 | 0.878575 | 00:03 |
| 6 | 1.216737 | 0.871548 | 0.878225 | 00:03 |
| 7 | 1.137540 | 0.832400 | 0.880371 | 00:03 |
| 8 | 1.083292 | 0.753999 | 0.909935 | 00:03 |
| 9 | 1.021289 | 0.762208 | 0.885468 | 00:03 |
| 10 | 0.957823 | 0.682070 | 0.904922 | 00:03 |
| 11 | 0.914076 | 0.667000 | 0.900920 | 00:03 |
| 12 | 0.868626 | 0.731849 | 0.892283 | 00:03 |
| 13 | 0.825539 | 0.636049 | 0.908815 | 00:03 |
| 14 | 0.784374 | 0.613358 | 0.928341 | 00:03 |
| 15 | 0.750682 | 0.584259 | 0.929360 | 00:03 |
| 16 | 0.721707 | 0.569473 | 0.929833 | 00:03 |
| 17 | 0.701580 | 0.573457 | 0.930522 | 00:03 |
| 18 | 0.676955 | 0.569403 | 0.931394 | 00:03 |
| 19 | 0.659083 | 0.566195 | 0.929665 | 00:03 |
Training using Pytorch Lightning
class LightModel(model_type.lightning.ModelAdapter):
    def configure_optimizers(self):
        return Adam(self.parameters(), lr=1e-4)

light_model = LightModel(model, metrics=metrics)
trainer = pl.Trainer(max_epochs=5, gpus=1)
trainer.fit(light_model, train_dl, valid_dl)
Using the model - inference and showing results
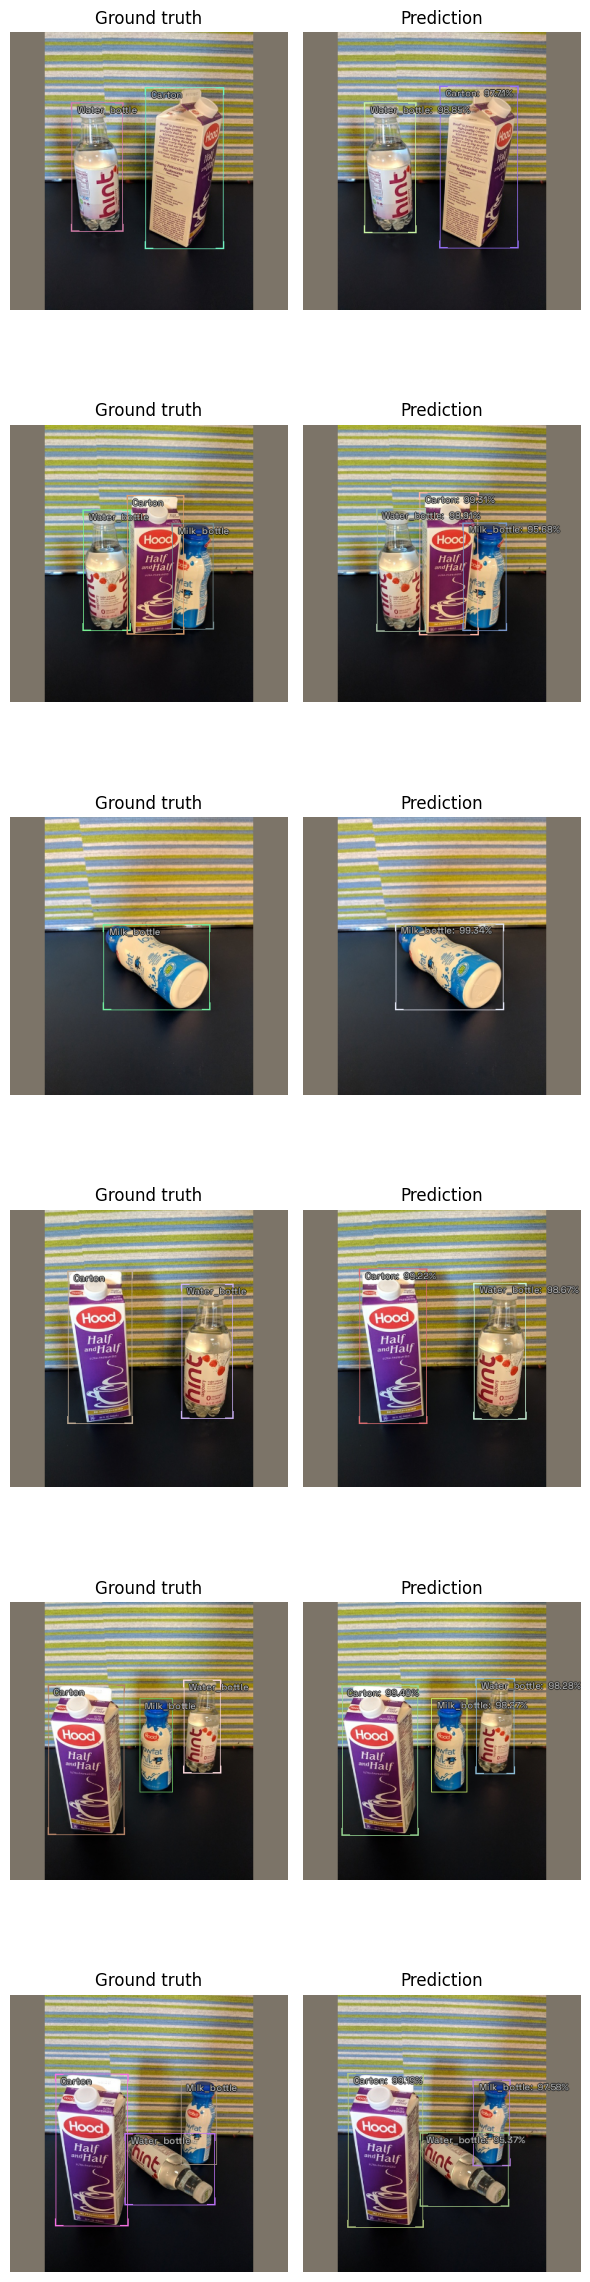
The first step in reviewing the model is to show results from the validation dataset. This is easy to do with the show_results function.
model_type.show_results(model, valid_ds, detection_threshold=.5)
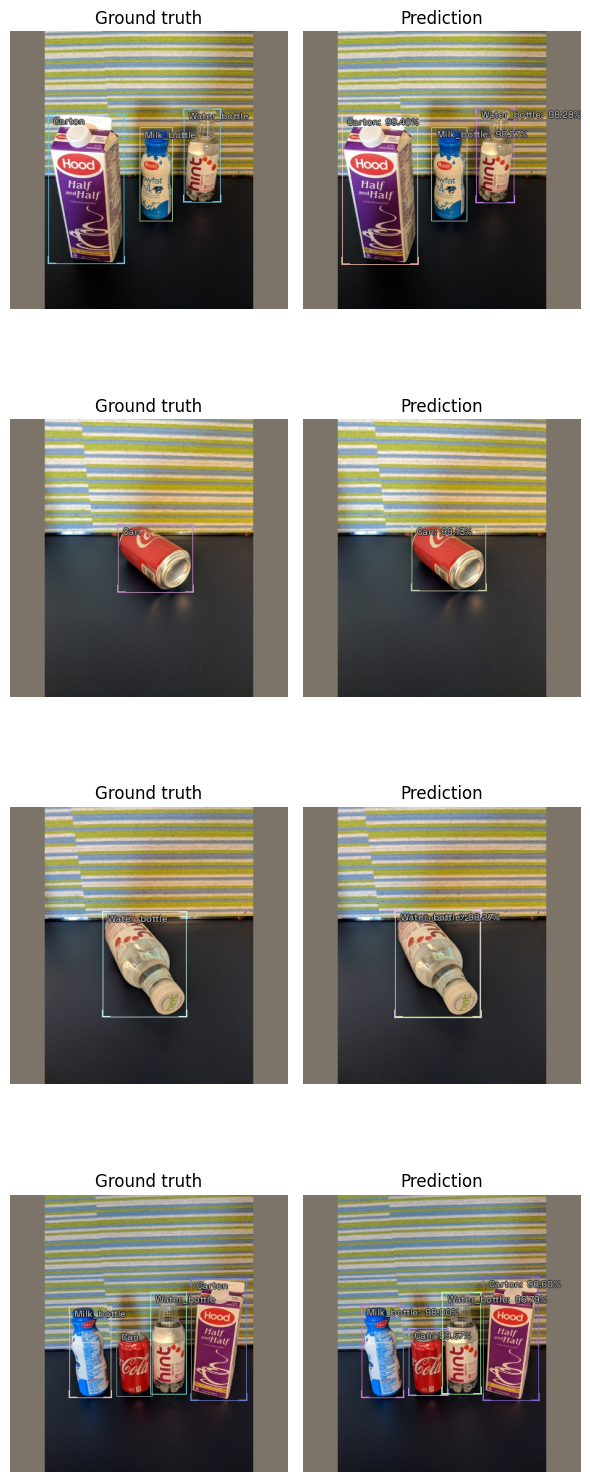
Prediction
Sometimes you want to have more control than show_results provides. You can construct an inference dataloader using infer_dl from any IceVision dataset and pass this to predict_dl and use show_preds to look at the predictions.
A prediction is returned as a dict with keys: scores, labels, bboxes, and possibly masks.
Prediction functions that take a detection_threshold argument will only return the predictions whose score is above the threshold.
Prediction functions that take a keep_images argument will only return the (tensor representation of the) image when it is True. In interactive environments, such as a notebook, it is helpful to see the image with bounding boxes and labels applied. In a deployment context, however, it is typically more useful (and efficient) to return the bounding boxes by themselves.
NOTE: For a more detailed look at inference check out the inference tutorial
infer_dl = model_type.infer_dl(valid_ds, batch_size=4, shuffle=False)
preds = model_type.predict_from_dl(model, infer_dl, keep_images=True)
show_preds(preds=preds[:4])
0%| | 0/7 [00:00<?, ?it/s]
Happy Learning!
If you need any assistance, feel free to join our forum.